


Speed Bump Installation Guide
GENERAL INFORMATION
The Ramp People’s range of speed bumps are made from recycled high density rubber and are available in high - visibility black and yellow.
Our 50mm high speed bumps have been designed to be crossed comfortably at speeds up to 10mph where as our 75mm high speed bumps have been designed to be crossed comfortably at speeds up to 5mph.
At The Ramp People we also speed cushions which are available in black or red. Speed cushions are designed to slow vehicles whilst ensuring emergency vehicles can safely bypass them without having to significantly reduce their speed. Our range of speed cushions are designed to reduce vehicle speeds down to 6mph.
Our speed bump kits are sold as a complete package of all the components required to install the speed bumps. All standard speed bump mid-sections have cats - eye style reflectors fitted as standard. Our 50mm high and 75mm high road humps are designed to support up to a 20,000kgs. Please note these speed ramps are not designed for articulated lorry. For HGV traffic management and speed ramps for industrial estates, please select the heavy duty speed bumps which offer a 60,000kg capacity.
The Ramp People's Speed Bump Features Include:
- Can support vehicles up to 60,000kg
- Embedded light reflectors are standard on both sides of all middle sections
- High visibility yellow sections contrasting with pure black sections
- Non-slip textured surface
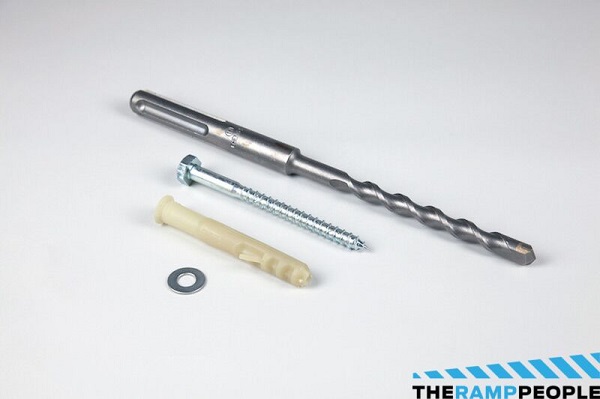
- FREE 14mm x 280mm long SDS Max drill bit and fixing kit included with all purchases (suitable for tarmac and concrete)
- Large stock of speed bumps / speed ramps held for free mainland UK delivery
- Volume pricing available on request
- Suitable for car parks, housing and industrial estates, construction sites, camping and caravan parks etc.

INSTALLATION GUIDE
Before installing your speed bumps, make sure that the road surface that you will be fitting them onto is clean, dry, and undamaged. Any damage to the surface should be repaired before the speed ramps are installed to provide a reasonably flat and consistent surface.
Lay out your speed bumps in the area you want to install them to make sure that they fit comfortably in your available space and that they lie flat on the surface ensuring they are tight and well aligned. Mark out on the substrate surface where the road humps are to be drilled and fitted. Then either drill the holes in the substrate through the bumps’ pre-made fixing holes, or remove the ramps after marking the position of the drill holes, and drill the holes independently of the speed bumps. The holes should be 120mm-1400mm to accommodate the fixings. We strongly suggest you drill a couple of test holes first to ensure the drill bit is of the correct size for the material you are drilling into. Finally, ensuring the holes are free from dust and debris, insert the fixings into the hole, and secure your speed bumps in place. We recommend that hand tools are used to prevent damage to fixings, however, power tools can be used with caution while ensuring bolts are not overtightened and damaged, but this is at the customer's own risk.
IMPORTANT - Positioning of your speed bumps:
- To maximise the life of your speed bumps, vehicles should drive over the product in a straight line. Vehicles turning on the speed bump may damage the speed bump and fixings and will likely cause excessive discomfort to the driver and passengers.
- Speed bumps should be set back from junctions to reduce the chance of vehicles stalling when pulling away. For more information on speed hump regulations visit gov.uk.
All our speed bumps and speed cushions are supplied with universal fixings suitable for tarmac and/or concrete, as per image below:
At The Ramp People we also stock a range of wall and pole mounted speed bump warning signs featuring a high contrast reflective surface for installation in car parks, private roads and areas where traffic calming has been installed.
GENERAL MAINTENANCE
The security of the fixings / adhesive should be checked on a regular basis. Circumstances will vary, based upon the volume of foot traffic etc., but as a guide, monthly inspections would be advisable.